
 The drywall in your home is subjected to damages of all kinds. Our walls get bashed by doorknobs, scraped and gouged by furniture, and riddled with dents and gashes, especially if there are kids or pets in the house. The good news is that repairing damaged drywall is easier than you might think. Take a look at our tips, head to the hardware store, and your walls will be looking great in almost no time!
DIY Drywall Repair
Patching your own drywall is a very doable DIY project, and can be done in an afternoon or over a weekend, depending on the scale of the damage. It’s also a relatively inexpensive project. In fact, you can usually buy a full sheet of drywall for under ten dollars, and pick up the other supplies at your nearest hardware store or find them in your garage.
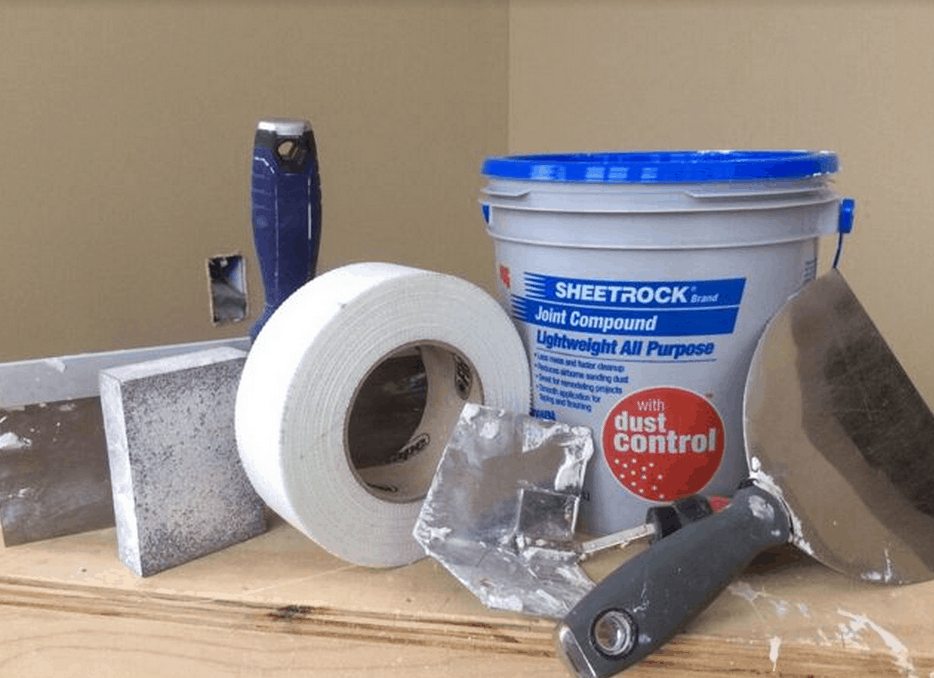
What you’ll need:
- Drywall knife
- Utility knife
- Drywall tape, either paper or mesh
- Drywall (A full sheet of drywall is 4-foot by 8-foot, but some stores sell smaller pieces, and you may have luck finding a piece that’s roughly the size of your repair.)
- Paint supplies, including rollers, brushes, trays, drop cloths, et al
- Scrap wood
- Saw (If you are working on a very small area, your drywall and utility knives will work well and you can forego the saw.)
- Mud pan
- Joint compound
- Paint (You may have extra paint from when you originally painted the room, or you may want to start over with a brand new color.)
Step 1: Prepare the area
Draw a square around the damaged area of the wall, and use your utility knife to cut out the square. If you have a hand-held oscillating saw on hand, that will do the job even better.
Step 2: Add scrap wood to support the area
Cut two pieces of scrap wood. Measure the pieces so that they are longer than the damaged area, and secure the pieces of wood within the drywall hole. You want the wood to fit into the existing drywall so you can put a screw through the drywall and into the wood.
Step 3: Install and secure new drywall
Measure the drywall square that you cut out in Step 1. Subtract ¼ of an inch from the height and width. Cut your new drywall to fit these new measurements.
Step 4: Apply joint compound
Fill your mud pan with joint compound and spread the compound across the patch using the appropriate method for the type of tape you are using.
- If you are using paper tape, spread the compound over the seams first, and then apply the tape over the compound. Smooth the tape over the compound using your drywall knife, and press firmly so that the tape is pressed flat into the compound.
- If you are using mesh tape, apply the tape over the seams first, and then smooth the compound over the tape.
Once the first coat of coat of joint compound is dry, scrape away any imperfections with your drywall knife and apply the second coat. Repeat the process for the third coat. For each new coat, spread the joint compound farther from the repair, so that it becomes well hidden. Each coat will take about 20-30 minutes to dry, and you can use a fan to speed up the process.
Step 5: Sand
When the final coat of joint compound is dry, sand the area flat using circular motions and a sanding block with approximately 150-grit. You want the area to be flattened against the existing wall, with the edges of the repair completely smoothed so that the repair will be inconspicuous.
Step 6: Prime
Paint over the patched area with primer. Depending on the quality of the primer you use, you may need to apply a second coat after the first coat dries. If you see bumps or ridges in the repaired area, apply another coat of joint compound and repeat the process of sanding and priming the area.
Step 7: Paint
Finally, paint over the primer using the paint of your choice. If you are only painting the repaired area, you will need to not only paint the repaired area, but also apply paint a minimum of one foot in each direction so that the repair blends into the existing paint job. If you choose to repaint the entire wall, the repaired area will be hidden even better.
If you’re the type of homeowner who enjoys a weekend DIY endeavor, a drywall repair can be a perfect project. If you’d rather not worry about doing the repair yourself, just find the best professional painting contractors in your area and leave it to them. All good painting companies make sure their technicians are trained in drywall repair and are able to paint the area or room so that the repair is undetectable.
The Best Jacksonville FL House Painting Company
Homeowners in Northeast Florida, from the Beaches to downtown Jacksonville, to the surrounding suburbs of Mandarin, Riverside, Ortega, and more, all call on The Painting Craftsmen for the drywall work around their homes. Our technicians are proficient and highly skilled in all types of painting prep work, and that includes drywall repair. Our course, when it comes to painting the repaired area, our team is the best in the business. We specialize in perfectly matching the repair to the rest of the room – you’ll never even know a repair took place! If you have an area of damaged drywall that has been driving you crazy, let us take care of that problem for you.